
How to use ThubmsUp! keyboard: Numbers and F-Keys


Updated: Nov 12

In the 
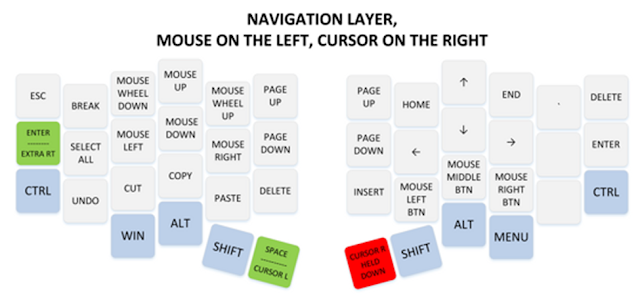
previous posts the QWERTY and navigation/editing layers were described. This one covers the numbers and F-Keys.


Default layout provides two ways of entering the numbers:

- using the numbers and F-keys layer that is activated with two thumbs holding CURSOR L and CURSOR R keys

- with NUMPAD layer which is turned on and off with TAB+C


The Numbers and F-Keys Layer


This layer works pretty much the same way as with the regular keyboards:


The top row got numbers from 1 through 9 and 0. Functional keys are located on the home row, with F11 and F12 spilling out on the bottom row.


(Additional Shift and Alt modifiers were left in this layer for historical reasons, when this layout was used with Let's Split and Dactyl-Manuform keyboards. They were and may be still handy to have there, even I rarely use them nowadays.)


The standard modifiers work the same way as usual, so one or both thumbs can press CURSOR L (or R) with Shift simultaneously.

Note that the Backspace key in the top right corner works as Backspace, which is a convenient way of removing the last entered symbols. Dot, comma, slash, angle brackets are also in their usual places, so the dates, decimal values could be entered without lifting the thumbs.

The same idea with the parenthesis, square and curly brackets, and the quotes. You may press and hold Tab without lifting the thumbs, so the "extra right" layer is turned on, like below. Once Tab is released (and provided the thumbs are still pressing CURSOR L and CURSOR R keys) you will be back to the numbers.


NUMPAD Layer


The numbers layer is convenient for a relatively short string of numbers. When you need to type multiple numbers, or if you need to trace them on a paper page, the number pad may be better.

The number pad layer is turned on with Tab+C, it remains on until you press Tab+C again (or until the keyboard is reconnected):


With this layer on the right side of the keyboard works as a numpad on the regular keyboards. Most of the keys on the left half are not doing anything, hence the picture above shows no legend for them.

Note that the navigation layers and the "extra-right" layers can be used the same way as with QWERTY layer. That is there is no need to switch to QWERTY layer in order to use the cursor navigation keys. Just hold CURSOR R down to temporarily switch to this navigation layer (notice the Back Space works as Delete.) Once thumb is lifted you will be back in the NUMPAD mode.


This way you may enter numbers or dates in Excel with one hand without moving it much.

To return to QWERTY mode - hit Tab+C again.


Comments

Popular posts from this blog

Adding a Touchpad

  Updated:   Jun 5 The unibody ThumbsUp! keyboards support ProGlide Cirque touchpads. Cirque touchpad fits nicely under the top PCB and are not visible from outside, so here its picture sticking out, not yet glued to the top PCB:     There are tracks leading to a connector on the top board. (Add it to the order and let me know if you want the connector to be installed, provided I have them in stock.)     You'd need to buy these two parts from Mouser (or any other vendor): Mouser #: Mfr. #: Desc.: 355-TM0400402024-301 TM040040-2024-301 Capacitance Touch Sensor Modules Capacitance Touch Sensor Modules 40mm Round SPI/I2C adhesive overlay 538-15166-0125 15166-0125 FFC / FPC Jumper Cables FFC / FPC Jumper Cables FFC 0.50 Type A 12 ckts lgt 127   Touchpads need to be modified: R1 needs to be removed to use I2C the boards support:   For the ProMicro and Atmel32U4-based keyboards the touchpad also needs to be made t...

Source Files and Default Firmware

Update 2025-04-19: I added VIAL support for ThumbsUp! v10, look for  thumbsup_rev10_rp2040_unibody_4x12_default_4x12_v10_vial.uf2 in the dropbox folder mentioned below. Updated:   Nov 12 I am cleaning up the firmware for all the keyboards. Two biggest changes are switch to the current QMK version 0.22.14 and enabling the VIA/REMAP support for all the keyboards. Look for the banners for each keyboard to see if the new firmware is ready.   Default (pre-compiled) firmware and JSON files for VIA/REMAP are in Dropbox here:   https://www.dropbox.com/scl/fo/2s8vz5tq5lffmpjuqbz2c/h?rlkey=71amow1mhhwfe54c0ywx59bfc&dl=0   You can flash them to your board. For AtMega/ProMicro based boards (*.hex files) use  QMK Toolbox  . For RP2040 boards (*.uf2 files) press twice the reset button (on the bottom side of the middle PCB), and copy the file to the drive newly added to the system. Note: v3 (5x12) and v4 use the same firmware (use the v4 one as the...

How to make a ThumbsUp! keyboard wireless

ThumbsUp! keyboards can be made wireless.  Not all of them, but those driven by ProMicro controller. There are multiple options, so far I only used one of them, the nice!nano v2 with ZMK-based firmware. Nice!nano is a drop-in replacement for AtMega32U4-based ProMicro units. It got a compatible pinout and is quite simple to use. Here is how it looks fully assembled: These are the parts: nice!nano v2 in the middle, the battery on the left and the pin headers on the right. Also there is a power switch on the PCB - it physically disconnects the battery from MCU/USB. I use pin headers/sockets to allow MCU swap. The default/standard sockets are too tall, so I have to pull the pins from headers and cut them so they are flush with the board surface. Make sure solder balls are small enough to  allow the raisers/connectors to actually connect. Notice the MCU goes components towards PCB. Make sure the B+ and B- holes are not used, they are added in nice!nano, but the ProMicro does not ha...